



What’s in my camera bag?
Over my 14 year journey as a professional photographer, there’s one question that keeps popping up: the curiosity of my camera equipment. I’m by no means a tech queen and prefer to keep things as simple as possible, so let’s peek into my bag.
My main camera equipment
Canon R6 camera
Canon 24-70mm f/2.8L II USM Lens
Canon 135mm f/2L Lens
Viltrox Mount Adapter EF-R2
Sandisk Extreme SD cards
Canon 580EXII speed light
Lenspen blower (for removing specks of dust)
Spare batteries (around 5 as the Canon R6 drains batteries faster than I drink diet Coke!)
… All of which are nestled in my camera Gracie Camera Bag
The 24-70mm lens is glued to my camera for all studio and product photography. The Mark II version, combined with the Canon R6, are spectacular for focusing and rarely misses a shot.
For outdoor photos, I still use the 24-70mm as it’s such a versatile lens but I’ve always been smitten with the 135mm lens as it’s beautiful for capturing portraits.
My back-up equipment
It’s vital I have backup equipment on hand and, whilst I don’t always carry all of the following with me, I’ll make sure I can easily access it if need be (unless I’m photographing a wedding and then I carry more).
Canon 5DIII camera
Canon 5DII camera
Canon 24-70mm f/2.8L
Canon 50mm f1.8
The Canon 5D’s are heavier in comparison to the Canon R6 but if you can get hold of a refurbished Canon 5DIII, you’ll have yourself a good quality camera which I feel handles the higher ISO settings better than the Canon R6.
The Canon 50mm f/1.8 lens is often referred to as the nifty fifty because it’s pretty good for the price currently retailing at £129. It can be slow to focus so I wouldn’t recommend it when photographing lively children/animals but it would be a good buy if you are looking for a lens on a budget and photograph, say, headshots or products.
Cameras with dual card slots
What’s great about the Canon R6 and 5DIII is that have dual card slots. This means on the misfortune of a card failing (which touch wood hasn’t happened to me but it can happen), I would have a back-up copy. I configure my cameras to capture in RAW format on Card 1 and JPEG on Card 2 and use the RAW files to edit keeping the JPEG files as a back up.
Light meters
One piece of equipment missing from my bag is a light meter which is used mainly by studio photographers. The lack of this in my bag might raise a few eyebrows from studio photographers but, after using one for about a year, I came to the conclusion that I preferred to work without one … and this works for me and my style of photography.
If you’re not familiar with the purpose of a light meter, it basically tells you the correct exposure you need for your camera and for some photographers it’s an essential part of their kit.
The tools I use for editing
As taking photos is just a small part of a photographer’s job, I thought it would be helpful to share the equipment and software I use for editing along with my process.
Editing equipment
Apple Macbook M1 Pro
Wacom Intros Pro Tablet and Graphic Pen
Transcend card reader
Anker USB port adapter
Lacie hard drives
LG UltraFine 31.5” 4K LCD Monitor (I mainly use this for non-editing work, i.e. website updates).
Software
Adobe Photoshop and Lightroom for editing.
PhotoMechanic for culling galleries.
My photo editing workflow
After a photo session and, once I’m at my desk, I take the following steps:-
Step 1 – Create a client folder on my hard drive with the following subfolders:-
[client name] Raws
[client name] Selected Raws
[client name] Jpegs
[client name] Finals
Step 2 – Download the photos into the Raw folder using a card reader to an external hard drive. I then make two additional 2 copies onto separate devices.
Step 3 – I use PhotoMechanic to cull the photos moving my favourite into the Selected Raws folder. You can use Lightroom for this too but I find PhotoMechanic is quicker to preview the photos.
Step 4 – Using Lightroom Classic, I upload the Selected Raws folder to carry out basic exposure, colour correction and lens profile corrections. I then export the photos into my “jpegs” folder using the following settings:-
File size: 5,400 px on the long edge. Resize to Fit box ticked.
Image Format: Jpeg
Colour space: sRGB
I’ll be honest and say that I’ve never truly bonded with Lightroom but I know its capabilities are vast and is where a lot of photographers carry out the majority of their editing so it’s definitely worth get
Step 5 – Finally, I use Photoshop for retouching, cropping and adding sparkle to my photos and move the edited photos to the “finals” folder.
Wacom Intros Pro Tablet and Pen
With a tablet and pen, my editing process is a lot more precise. It feels so much more natural and if you want to speed up your workflow, you can set up shortcuts with your pen (though I’ve never gotten around to this). Going back to using a mouse or trackpad feels like wishing for extra hours in the day – it’s just not efficient for me.
The main downfall with Wacom pens is that they break quite a bit. I’m not sure if I’m heavy handed with my pens but I find they have a lifespan of around a year. On the upside, if the tablet or pen break under warranty, Wacom are very good at exchanging the item.
If you haven’t used a tablet and pen before, and don’t want to go to the expense of the Pro version, I would recommend the Wacom Intros S or the One by Wacom Graphics Tablet. They are a little clunkier than the Pro version but worth trying if you are on the fence about one.
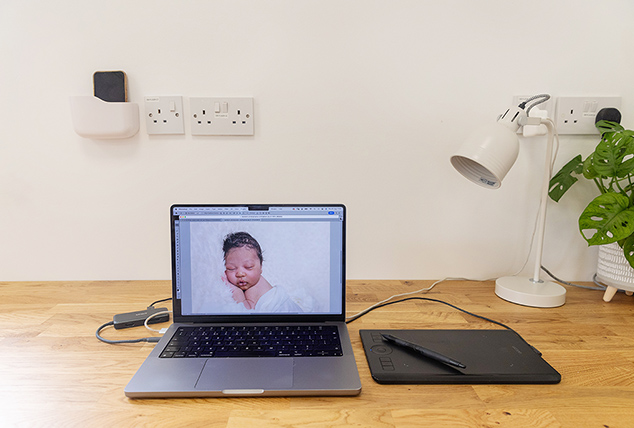
My desk set-up in The Createry – this is all I bring with me when editing after a photo session.
Final words from behind the lens
There is no right or wrong piece of equipment and whether you fall into the Canon, Nikon, Fuji or Sony camp, every photographer’s needs are different. The list of items I’ve bought and never used is probably bigger than the list of what I use now because I fell into the trap of needing the latest “must-have”.
It’s great to explore new equipment and see how it fits into your creative process but the key thing is to enjoy taking photos and remember that equipment is simply a tool for getting the job done effectively.